How to Import payer data to Payment Portal
Overview
This page guides you through the process of importing data for your payers (customers) into Payrix's Payment Portal.
Imported data can includes payer’s name, contact details, credit card or bank account. This page outlines general guidelines and the four steps to import your payer data:
Add payers to template spreadsheet
Save XLS file securely
Create a CSV copy
Import CSV to Payment Portal
See ‘What file imports do we support’ to identify what type of file imports the Payrix Portal supports and select the sample/template file relevant to your desired import. The 4 steps below will guide you the general process.
Data security compliance
Before proceeding, you must consider your obligations to remain compliant with the Payment Card Industry Data Security Standard (PCI DSS).
Any business that handles card payments must comply with PCI DSS. This is mandated by the banks and card schemes – businesses that are non-compliant face large fines and leave themselves open to the risk of fraud and security breaches.
Payrix is certified as compliant with PCI DSS Level 1, which is the highest level of compliance. Importing data into Payment Portal is secure and PCI DSS compliant. However, it is the responsibility of a business to remain compliant when handling and storing data on its own local network.
Further information can be found on the PCI Security Standards Council website here.
To discuss your compliance with Payrix's Risk and Fraud team, you can contact them on 1300 592 283 or risk@payrix.com.au.
Step 1: Add payers to a spreadsheet
This step describes how to add your payer data to a spreadsheet.
We recommend the steps below to avoid complications caused by Excel. When opening a CSV file, Excel automatically resets cell formatting from what was previously set. This can result in cell contents changing – common errors are seen in dates, numbers starting in zero, and numbers with more than 15 digits (i.e. credit cards) which can have their last digit replaced by a zero.
To avoid this, we recommend using XLS files (and not CSV) for data entry and editing. This can then be saved as a CSV copy which is used for importing into Payment Portal. Further changes are only made in the XLS file, and re-saved as a CSV file for importing.
Download and open Payrix's template XLS spreadsheet from this link:
Australia & New Zealand - Import Payer (Full Details) - template.xlsx
A sample file is also available, showing you example rows of data:
Australia & New Zealand - Import Payer (Full Details) - sample.xlsx
Start adding your payer details to the spreadsheet.
It is important that you follow the notes below on the format of your data in this spreadsheet.
There are 17 columns in the template – do not remove or add any columns.
The format setting for ALL cells is Text – do NOT change the format setting for any of the cells.

Each row will contain details of a payer record – and a row can only contain ONE payment method for a payer, i.e. credit card or bank account.
If a payer has more than one payment method, create a separate row for each payment method.
Give EACH of these payer record rows a different Business Unique ID (column A).
Use the same Business Display ID (column B) for each row – this makes it easier to search for a payer with multiple payer records.
Follow the guidance in the table below for each column.
Validation rules on special characters need to be followed for all cells:
Brackets and dashes can be used, these characters will be displayed
Commas can be used, but these will be removed from the payer record
The @ character must be used in email addresses
Do not use any other characters –this includes not using apostrophe (inverted comma) as CSV files cannot be imported with these.
Table template
Column | Field name | Mandatory | Guidance |
|---|---|---|---|
A | Business Unique ID | Yes | This is your own unique ID that you give each payer record. You can create your own ID, or you may already have one from another system. |
B | Business Display ID | No | The format of this ID is flexible – use a descriptive ID that you will recognise in your payers list, or you can keep it the same as the Business Unique ID. The exception is payers with multiple Business Unique IDs – we recommend you give them the same Business Display ID to assist with payer search. |
C | Last name | Yes | If your payer is a business and not a person, then you can use this field for the name of the business. |
D | First name | No | If you’re using the Last name for a business, there’s no need to use this field. |
E, F, H | Address street, suburb, postcode | No | |
G | Address State | No | Australia: only use ACT, NSW, NT, QLD, SA, TAS, WA New Zealand: write out the province name in full. USA: Only use two-letter state abbreviations |
I | No | Must be an email address with an @ character. | |
J, K | Phone, mobile | No | Mobile and phone numbers must start in zero – you should include the area code. Brackets and spaces are optional. |
L, M, N | Bank account, BSB, Name (AUS / NZ) OR Bank routing number, Account number, Name (USA) | Enter either bank OR card details – not both | Do not use spaces or punctuation for the BSB, routing number or account number. |
O, P, Q | Credit card number, expiry date, name | Enter either bank OR card details – not both | Card number must have sixteen digits. Expiry date must be six digits with no spaces or punctuation, consisting of four digit year and two-digit month: YYYYMM |
Duplicate payers
If you import a payer with a Business Unique ID already listed in your Payment Portal account, the new details in your spreadsheet will overwrite the older details in Payment Portal. The system will not display a message to notify you about any duplicate payers, the older details will be overwritten automatically.
Step 2: Save XLS file securely
When you have finished adding payer details, you can save the spreadsheet on your secure local network.
When storing data locally you must remain compliant with PCI DSS, as covered above in Data security compliance.
Select File > Save As.
The filename is flexible – keep the template name or choose your own.
Save as an Excel Workbook (.xlsx), or for older versions use Excel 97-2003 Workbook (.xls) – and keep the file open.
Step 3: Create a CSV copy
With the XLS file still open, you’ll now create a CSV copy of the spreadsheet which will be used for the import process.
Select File > Save As.
To keep it simple, use the same filename as your XLS file.
From the file format dropdown, select CSV (Comma delimited) (*.csv). Some devices may use alternative CSV formats such as CSV (Macintosh) and CSV (MS-DOS) – if the file extension is *.csv it can be imported.
Close the CSV file.
You now have two copies of the spreadsheet saved locally:
XLS file – for any further changes you need to make.
CSV file – for importing into Payment Portal, not for editing.
After making changes to an XLS file, follow the same process as before – save the XLS file and then save again as a CSV, over-writing the previous version. The updated CSV file can then be imported.
Step 4: Import CSV to Payment Portal
Follow these steps to import payer data to Payrix's Payment Portal.
You must never email a spreadsheet containing payer data to Payrix or another party – email is not a secure channel. Importing data directly into Payment Portal via the steps below ensures your data is transferred securely.
Log into Payment Portal - https://portal.payrix.com.au
On the main menu, click on header ‘Imports’

If the ‘Import’ option isn’t available, contact Payrix Client Support
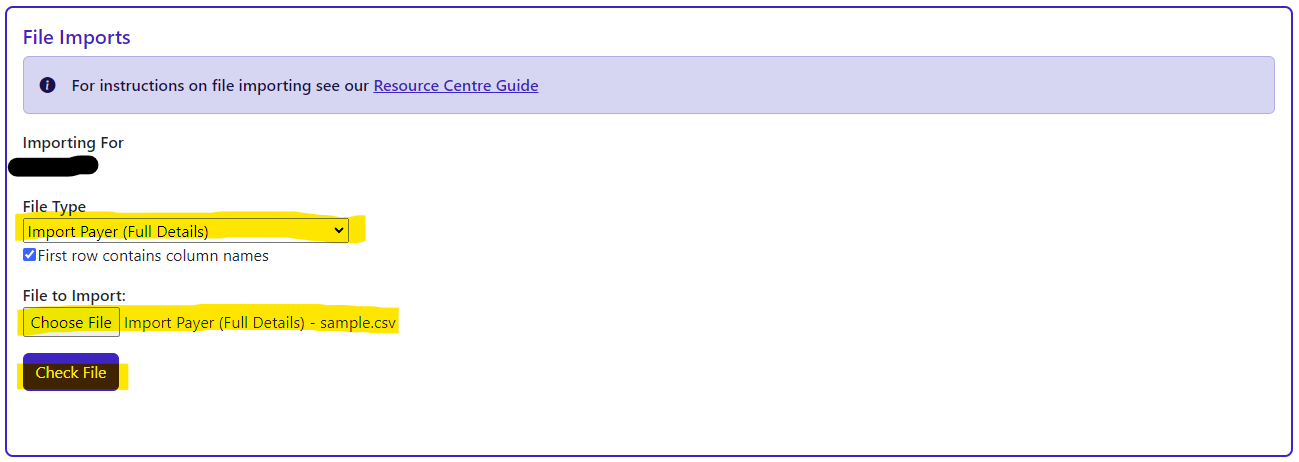
The File ‘Imports’ page will be displayed.
On the Type drop-down menu, select Import Payers (Full Details). If this option isn’t available, contact Payrix Client Support.
Make sure that the box is ticked for First row contains column names.
Click Choose File
Locate the CSV file you saved earlier - click on it and click Open.
Click Check File to validate the format of you data.
A message will be displayed with the results of the validation.
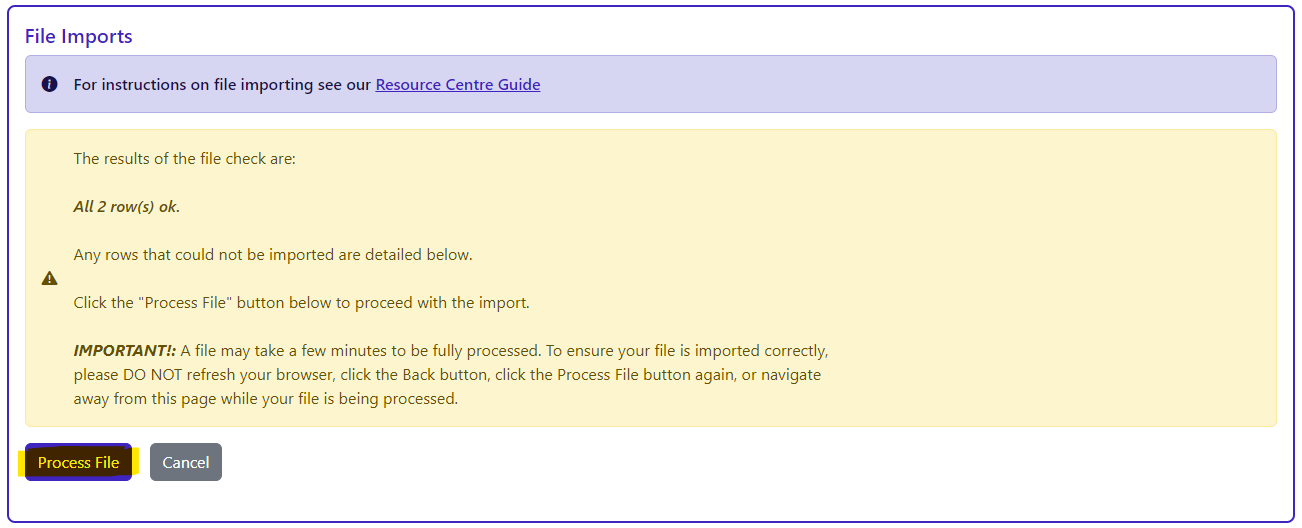
If all rows are confirmed as OK, click Process File.
If any rows could not be processed, click Cancel then make corrections in your XLS file and re-import the data.
A confirmation message will be displayed and a summary is displayed in a table of recent file imports.
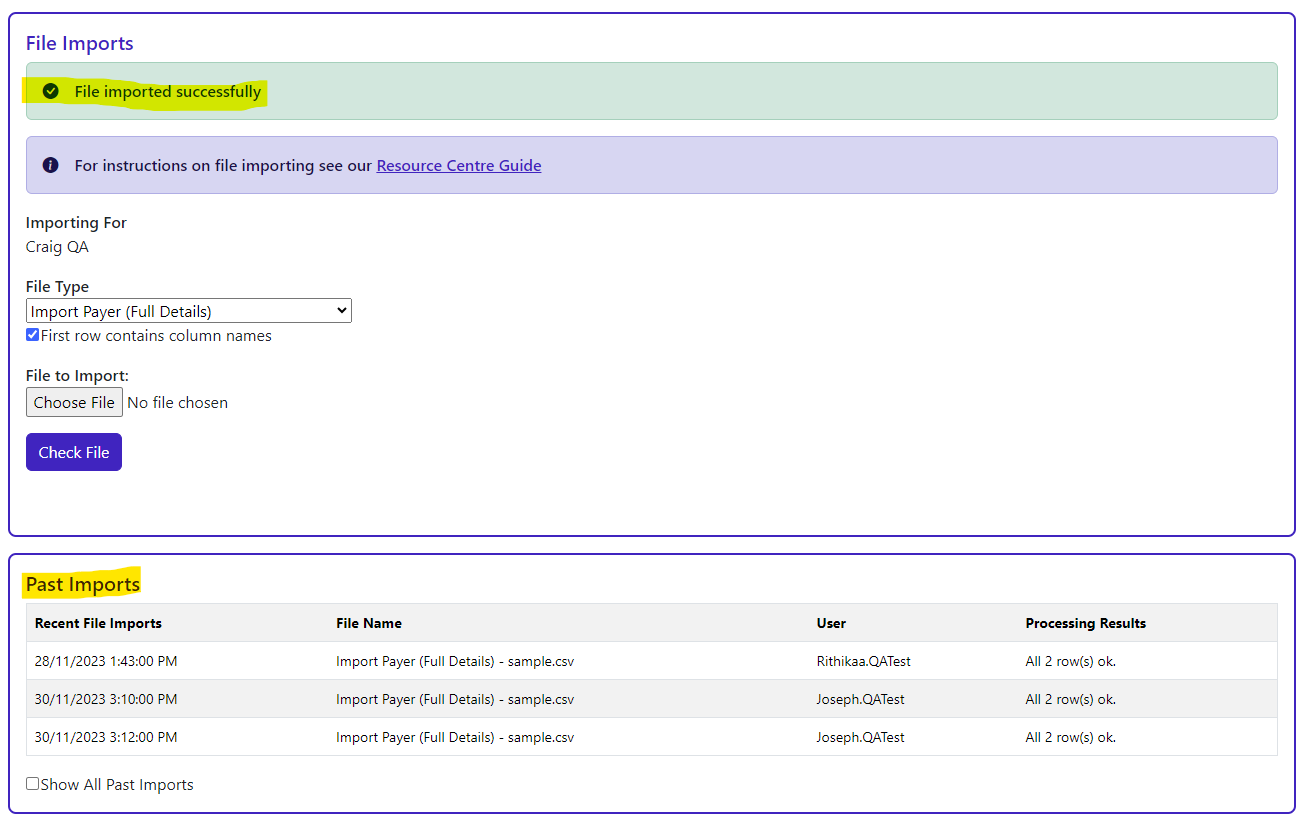
Congratulations, you have completed the import process.
You can repeat this process as many times as you like in the future. Be careful about importing any duplicate payers as new details in your CSV will overwrite the older details in Payment Portal.
To view imported payers
You can check that your payers have been added to Payment Portal:
On the main menu click Payers.
The payer search fields will be displayed
To display all your payers just click Search – or enter payer details into the search fields for a more refined list.
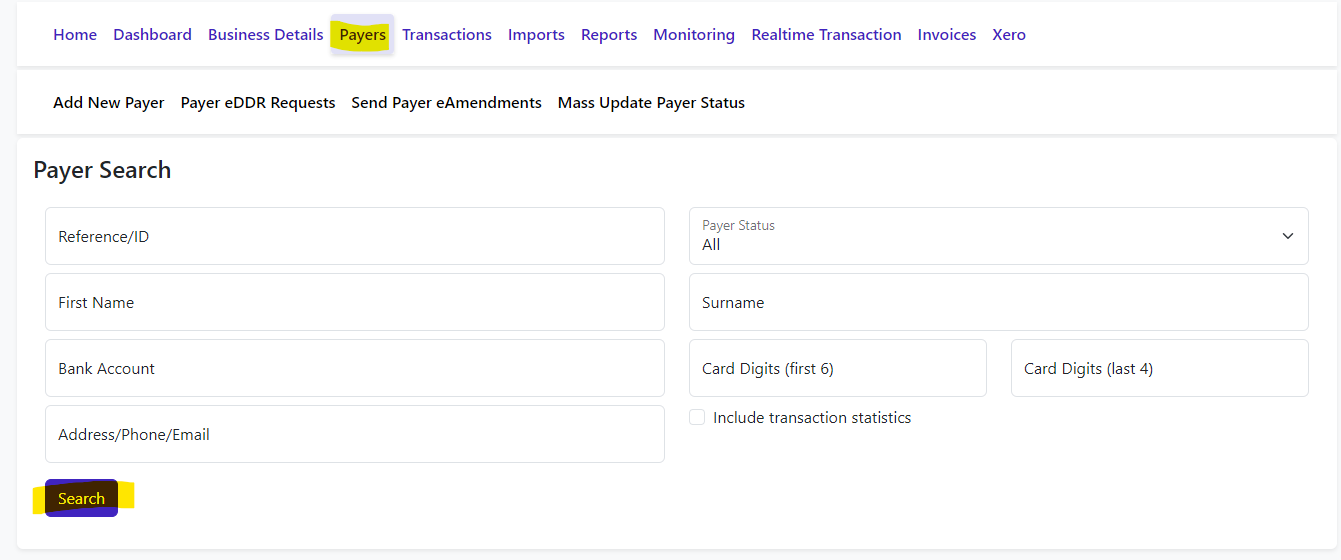
A list of your payers will be displayed
If you want to view the details of a payer record, click on its Payer ID under the Payer # column.

The payer details will then be displayed.